Ubuntu / CentOS 配置Apache、sqlite3、apr、apr-util、pcre2、zlib
系统环境: Ubuntu 10.10(linux-kernel 2.6.35-22)
安装版本: httpd-2.4.34.tar.gz
Apache httpd 官网:http://httpd.apache.org
pcre 官网:http://www.pcre.org , GitHub (pcre2,最新,推荐)、 sourceforge (PCRE和PCRE2,较旧,舍弃)
pcre2-10.44.tar.gz pcre2-10.44.tar.bz2 pcre2-10.44.zip
The older, but still widely deployed PCRE(Perl Compatible Regular Expressions) library, originally released in 1997, is at version 8.45. This version of PCRE is now at end of life, and is no longer being actively maintained(8.45版本之前是pcre,之后版本是pcre2). Version 8.45 is expected to be the final release of the older PCRE library, and new projects should use PCRE2 instead
There are two major versions of the PCRE library. The current version, PCRE2, released in 2015, is now at version 10.39.(最新版本是 pcre2-10.44.tar.gz 2024-06-01,详见 GitHub )
PCRE(Perl Compatible Regular Expressions,Perl兼容性正则表达式)是一个Perl库,包括 perl 兼容的正则表达式库。这些在执行正规表达式模式匹配时用与Perl 5同样的语法和语义是很有用的,支持包含 Apache, PHP, KDE, Postfix, and Nmap.
Apache 和 Nginx安装须要依赖三个基础包,这是最基础的三个包,其它扩展模块可通过手冊安装
- zlib:主要用于支持将http内容进行gzip压缩,用于降低网络传输流量
- pcre2:用于支持nginx的正則表達式。配置文件里都须要用到正则表达式
- openssl:用于nginx支持https请求
apr / apr-util / apr-iconv 官网:http://apr.apache.org/download.cgi
apr-1.7.4.tar.gz (2023-04-16)
apr-util-1.6.3.tar.gz (2023-02-01)
apr-iconv-1.2.2.tar.gz (2017-10-22)
zlib 官网:https://www.zlib.net , Github
zlib-1.3.1.tar.gz (202401-23,安装后,无 bin 目录,只有 lib 目录)
sqlite 官网:https://www.sqlite.org/download.html , https://github.com/sqlite/sqlite
sqlite-autoconf-3460000.tar.gz (version 3.46.0, 2024-05-23)
sqlite-autoconf-3410200.tar.gz (version 3.41.2, 2023-03-22)
sqlite-amalgamation-3240000.zip (version 3.24.0, 2018-06-04)
sqlite-snapshot-201807272333.tar.gz (2018-06-04)
The version is encoded so that filenames sort in order of increasing version number when viewed using "ls". For version 3.X.Y the filename encoding is 3XXYY00(7位,最后2位ZZ没用到). For branch version 3.X.Y.Z, the encoding is 3XXYYZZ.
CentOS 安装配置 httpd
下载 apr-1.6.3.tar.gz 、apr-util-1.6.1.tar.gz 、apr-iconv-1.2.2.tar.gz 、
sqlite-autoconf-3460000.tar.gz 、 pcre-8.42.tar.gz 、httpd-2.4.34.tar.gz 、
注意: --prefix=/usr/local/sqlite3 后不要添加 / ,安装时/usr/local/sqlite3会自动认为是目录,否则会是 /usr/local/sqlite3//xxx
“configure --prefix=/” 的作用是编译的时候用来指定程序存放路径 。
若不指定prefix,安装文件可能分散在各个目录:
1)可执行文件默认放在/usr/local/bin/
2)库文件默认放在/usr/local/lib/
3)配置文件默认放在/usr/local/etc/
4)资源文件放在/usr/local/share/
5)头文件放在 /usr/local/include/
## sqlite3 通过的 ./configuration && make && make install 安装分散在各个目录
#
# ls -l /usr/local/bin/sqlite3
-rwxr-xr-x 1 root root 7641192 Jun 29 12:01 /usr/local/bin/sqlite3           # sqlite3
#
# ls -l /usr/local/lib/libsqlite3.*
-rw-r--r-- 1 root root 15017132 Jun 29 12:01 /usr/local/lib/libsqlite3.a     # sqlite3
-rwxr-xr-x 1 root root      982 Jun 29 12:01 /usr/local/lib/libsqlite3.la
lrwxrwxrwx 1 root root       19 Jun 29 12:01 /usr/local/lib/libsqlite3.so -> libsqlite3.so.0.8.6
lrwxrwxrwx 1 root root       19 Jun 29 12:01 /usr/local/lib/libsqlite3.so.0 -> libsqlite3.so.0.8.6
-rwxr-xr-x 1 root root  6225192 Jun 29 12:01 /usr/local/lib/libsqlite3.so.0.8.6
#
# ls -l /usr/local/etc/      # sqlite3 无配置文件
total 0
#
# ls -l /usr/local/share/    # sqlite3 man帮助文档
total 20
drwxr-xr-x   7 root root 4096 Jun 28 13:02 aliyun-assist
drwxr-xr-x.  2 root root 4096 Apr 11  2018 applications
drwxr-xr-x   2 root root 4096 Jun 28 15:39 assist-daemon
drwxr-xr-x.  2 root root 4096 Apr 11  2018 info
drwxr-xr-x. 21 root root 4096 Jun  3 17:54 man
#
# ls -l /usr/local/include/sqlite3*
-rw-r--r-- 1 root root  38149 Jun 29 12:01 /usr/local/include/sqlite3ext.h    # sqlite3
-rw-r--r-- 1 root root 644069 Jun 29 12:01 /usr/local/include/sqlite3.h
若指定prefix,直接删掉一个文件夹就够了,例如删除 /usr/local/apr 即可。
make 卸载安装命令如下:make uninstall
## 卸载安装命令: make uninstall && make clean
#
# make uninstall
 ( cd '/usr/local/bin' && rm -f sqlite3 )    # 删除 bin
 ( cd '/usr/local/include' && rm -f sqlite3.h sqlite3ext.h )  # 删除 include
 /bin/sh ./libtool   --mode=uninstall rm -f '/usr/local/lib/libsqlite3.la'
libtool: uninstall: rm -f /usr/local/lib/libsqlite3.la /usr/local/lib/libsqlite3.so.0.8.6 /usr/local/lib/libsqlite3.so.0 /usr/local/lib/libsqlite3.so /usr/local/lib/libsqlite3.a
 ( cd '/usr/local/share/man/man1' && rm -f sqlite3.1 )   # 删除 share/man
 ( cd '/usr/local/lib/pkgconfig' && rm -f sqlite3.pc )   # 删除 lib
#
# make clean
 rm -f sqlite3
test -z "libsqlite3.la" || rm -f libsqlite3.la
rm -f ./so_locations
rm -rf .libs _libs
rm -f *.o
rm -f *.lo
1. 安装 sqlite3
wget https://www.sqlite.org/2024/sqlite-autoconf-3460000.tar.gz
tar zxvf sqlite-autoconf-3460000.tar.gz
cd sqlite-autoconf-3460000/
./configure --prefix=/usr/local/sqlite3
make && make install
## 查看安装帮助

# ./configure --help | grep -iwE "\-\-with|\-\-prefix"
  --prefix=PREFIX         install architecture-independent files in PREFIX
an installation prefix other than `/usr/local' using `--prefix',
for instance `--prefix=$HOME'.
  --disable-option-checking  ignore unrecognized --enable/--with options
  --with-PACKAGE[=ARG]    use PACKAGE [ARG=yes]
  --without-PACKAGE       do not use PACKAGE (same as --with-PACKAGE=no)
  --with-pic[=PKGS]       try to use only PIC/non-PIC objects [default=use
  --with-aix-soname=aix|svr4|both
  --with-gnu-ld           assume the C compiler uses GNU ld [default=no]
  --with-sysroot[=DIR]    Search for dependent libraries within DIR (or the
2. 安装 pcre2 和 pcre (安装任一个即可,推荐安装 pcre2)
1)安装 pcre2
wget https://github.com/PCRE2Project/pcre2/releases/download/pcre2-10.44/pcre2-10.44.tar.bz2
tar jxvf pcre2-10.44.tar.bz2
cd pcre2-10.44/
./configure --prefix=/usr/local/pcre2
make && make install
2)安装 pcre
tar zxvf pcre-8.42.tar.gz
cd pcre-8.42
./configure --prefix=/usr/local/pcre
make && make install
## 查看安装帮助
# ./configure --help | grep -iwE "\-\-with|\-\-prefix"
  --prefix=PREFIX         install architecture-independent files in PREFIX
an installation prefix other than '/usr/local' using '--prefix',
for instance '--prefix=$HOME'.
  --disable-option-checking  ignore unrecognized --enable/--with options
  --with-PACKAGE[=ARG]    use PACKAGE [ARG=yes]
  --without-PACKAGE       do not use PACKAGE (same as --with-PACKAGE=no)
  --with-pic[=PKGS]       try to use only PIC/non-PIC objects [default=use
  --with-aix-soname=aix|svr4|both
  --with-gnu-ld           assume the C compiler uses GNU ld [default=no]
  --with-sysroot[=DIR]    Search for dependent libraries within DIR (or the
  --with-pcre2grep-bufsize=N
  --with-pcre2grep-max-bufsize=N
  --with-link-size=N      internal link size (2, 3, or 4 allowed; default=2)
  --with-max-varlookbehind=N
  --with-parens-nest-limit=N
  --with-heap-limit=N     default limit on heap memory (kibibytes,
  --with-match-limit=N    default limit on internal looping (default=10000000)
  --with-match-limit-depth=N
3. 安装 apr
wget https://downloads.apache.org/apr/apr-1.7.4.tar.gz
tar zxvf apr-1.7.4.tar.gz
cd apr-1.7.4/
./configure --prefix=/usr/local/apr
make && make install
## 查看安装帮助

# ./configure --help | grep -iwE "\-\-with|\-\-prefix"
  --prefix=PREFIX         install architecture-independent files in PREFIX
an installation prefix other than `/usr/local/apr' using `--prefix',
for instance `--prefix=$HOME'.
  --disable-option-checking  ignore unrecognized --enable/--with options
  --with-PACKAGE[=ARG]    use PACKAGE [ARG=yes]
  --without-PACKAGE       do not use PACKAGE (same as --with-PACKAGE=no)
  --with-pic[=PKGS]       try to use only PIC/non-PIC objects [default=use
  --with-aix-soname=aix|svr4|both
  --with-gnu-ld           assume the C compiler uses GNU ld [default=no]
  --with-sysroot[=DIR]    Search for dependent libraries within DIR (or the
  --with-installbuilddir=DIR location to store APR build files
  --with-efence[=DIR]     path to Electric Fence installation
  --with-valgrind[=DIR]   Enable code to teach valgrind about apr pools
  --with-sendfile         Override decision to use sendfile
  --with-egd[=DIR]        use EGD-compatible socket
  --with-devrandom[=DEV]  use /dev/random or compatible [searches by default]
4. 安装 apr-iconv
wget https://downloads.apache.org/apr/apr-iconv-1.2.2.tar.gz
tar zxvf apr-iconv-1.2.2.tar.gz
cd apr-iconv-1.2.2/
./configure --prefix=/usr/local/apr-iconv --with-apr=/usr/local/apr
make && make install
5. 安装 apr-util
首先安装 expat-devel,否则会报错:[xml/apr_xml.lo] Error 1
yum -y install expat-devel
wget https://downloads.apache.org/apr/apr-util-1.6.3.tar.gz
tar zxvf apr-util-1.6.3.tar.gz
cd apr-util-1.6.3/
./configure --prefix=/usr/local/apr-util --with-apr=/usr/local/apr --with-apr-iconv=usr/local/apr-iconv --with-sqlite3=/usr/local/sqlite3
make && make install
## 查看安装帮助

# ./configure --help | grep -iwE "\-\-with|\-\-prefix"
  --prefix=PREFIX         install architecture-independent files in PREFIX
an installation prefix other than `/usr/local/apr' using `--prefix',
for instance `--prefix=$HOME'.
  --disable-option-checking  ignore unrecognized --enable/--with options
  --with-PACKAGE[=ARG]    use PACKAGE [ARG=yes]
  --without-PACKAGE       do not use PACKAGE (same as --with-PACKAGE=no)
  --with-apr=PATH         prefix for installed APR or the full path to   # 需先安装
  --with-apr-iconv=DIR    relative path to apr-iconv source              # 需先安装,相对路径
  --with-crypto           enable crypto support                          # 需先安装
  --with-openssl=DIR      specify location of OpenSSL                    # 需先安装
  --with-nss=DIR          specify location of NSS
  --with-commoncrypto=DIR specify location of CommonCrypto
  --with-lber=library     lber library to use
  --with-ldap-include=path  path to ldap include files with trailing slash
  --with-ldap-lib=path    path to ldap lib file
  --with-ldap=library     ldap library to use
  --with-dbm=DBM          choose the DBM type to use.
  --with-gdbm=DIR         enable GDBM support
  --with-ndbm=PATH        Find the NDBM header and library in `PATH/include'
  --with-berkeley-db=PATH Find the Berkeley DB header and library in
  --with-pgsql=DIR        specify PostgreSQL location
  --with-mysql=DIR        enable MySQL DBD driver        # 需先安装
  --with-sqlite3=DIR      enable sqlite3 DBD driver      # 需先安装
  --with-sqlite2=DIR      enable sqlite2 DBD driver
  --with-oracle-include=DIR
  --with-oracle=DIR       enable Oracle DBD driver; giving ORACLE_HOME as DIR
  --with-odbc=DIR         specify ODBC location
  --with-expat=DIR        specify Expat location
  --with-iconv=DIR        path to iconv installation
6. 安装 zlib (无 bin 目录,只有 lib 目录)
wget https://github.com/madler/zlib/archive/refs/tags/v1.3.1.tar.gz
mv v1.3.1.tar.gz zlib-1.3.1.tar.gz
tar zxvf zlib-1.3.1.tar.gz
cd zlib-1.3.1/
./configure --prefix=/usr/local/zlib
make && make install
# tree /usr/local/zlib/
/usr/local/zlib/
├── include
│   ├── zconf.h
│   └── zlib.h
├── lib
│   ├── libz.a
│   ├── libz.so -> libz.so.1.3.1
│   ├── libz.so.1 -> libz.so.1.3.1
│   ├── libz.so.1.3.1
│   └── pkgconfig
│       └── zlib.pc
└── share
    └── man
        └── man3
            └── zlib.3
7. 清理环境,重新安装httpd
cd httpd-2.4.34
make clean install
make clean
然后,指定环境路径,重新安装 httpd
cd httpd-2.4.34
./configure --prefix=/usr/local/httpd --enable-module=all --with-apr=/usr/local/apr --with-apr-util=/usr/local/apr-util --with-pcre=/usr/local/pcre
make && make install
Ubuntu 安装配置 httpd
1、下载 httpd
下载 httpd-2.4.2.tar.gz (最新版 httpd-2.4.34.tar.gz)
2、解压 httpd
tar -zxvf httpd-2.4.2.tar.gz

3、安装 httpd
进入解压后的目录
cd httpd-2.4.2
创建 /opt/ httpd-2.4.2-server
sudo mkdir -p /opt/ httpd-2.4.2-server
安装到指定目录 /opt/httpd-2.4.2-server
sudo ./configure --prefix=/opt/ httpd-2.4.2-server/ --enable-module=so
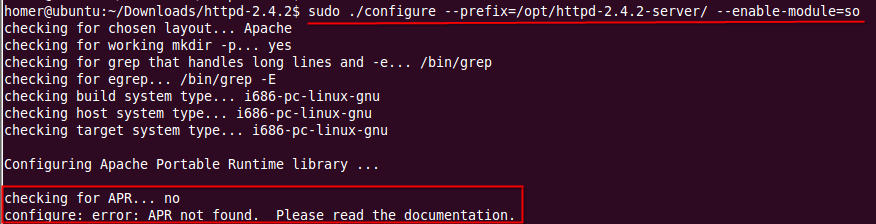
上图中,出现了 APR not found 错误!
在安装Apache过程中,依次遇到的错误与解决方法如下:
问题1: APR not found
a、下载 apr-1.4.6.tar.gz ( 官方网址 )
b、解压 apr
tar -zxvf apr-1.4.6.tar.gz
cd apr-1.4.6
c、安装 apr
sudo mkdir -p /opt/apr
sudo ./configure --prefix=/opt/apr
sudo make
sudo make install
问题2: APR-util not found
a、下载 apr-util-1.4.1.tar.gz ( 官方网址 )
b、解压 apr-util
tar -zxvf apr-util-1.4.1.tar.gz
cd apr-util-1.4.1
c、安装 apr
sudo mkdir -p /opt/apr-util
sudo ./configure --prefix= /opt/apr-util --with-apr = /opt/apr
sudo make
sudo make install
问题3: pcre-config for libpcre not found
a、下载 pcre-8.31.tar.gz ( 官方网址, 注意:不是 pcre2)
b、解压 pcre
tar -zxvf pcre-8.31.tar.gz
cd pcre-8.31
c、安装 apr
sudo mkdir -p /opt/pcre
sudo ./configure --prefix= /opt/pcre
sudo make
sudo make install
问题4: 清理编译后重新编译
sudo make clean; make
sudo make clean install
完成上述准备后,再次安装 httpd ( 附带参数 ):
sudo ./configure --prefix=/opt/httpd-2.4.2-server/ --enable-module=all --with-apr=/opt/apr --with-apr-util=/opt/apr-util --with-pcre=/opt/pcre
sudo make
sudo make install
手动启动apache
sudo ./bin/apachectl start // stop, restart
httpd 开机启动脚本
第一步:复制脚本
cp /usr/local/httpd-2.4.34-server/bin/apachectl /etc/init.d/httpd
第二步:注释说明
vim /etc/init.d/httpd
在第一行#!/bin/sh下增加两行文字
# chkconfig: 35 70 30 这里的35指的是在3和5级别开启该服务 70是开机启动服务在70位,30是关机关闭服务在30位,一般启动服务的顺序和关闭顺序的和100。
# description: The Apache HTTP Server 描述信息 这里的#不再是注释符,而是服务列表中的特殊用法。
chkconfig 解释:
# chkconfig: 2345 10 90 其中 2345是设为要启动的运行级别,10是启动优先级,90是杀死进程的优先级,谁优先谁先挂的意思
2345 表示系统运行级别,Linux下系统服务的运行级别分别有0~6个级别,共7个级别,分别代表的含义如下:
0-表示关机
1-单用户模式
2-无网络连接的多用户命令行模式
3-有网络连接的多用户命令行模式
4-不可用
5-带图形界面的多用户模式
6-重新启动
10 90 后两位分别代表启动/停止优先级,优先级范围是0~100,数字越大,优先级越低。
# chkconfig
aegis           0:off   1:off   2:on    3:on    4:on    5:on    6:off
agentwatch      0:off   1:off   2:on    3:on    4:on    5:on    6:off
httpd           0:off   1:off   2:on    3:on    4:on    5:on    6:off
netconsole      0:off   1:off   2:off   3:off   4:off   5:off   6:off
network         0:off   1:off   2:on    3:on    4:on    5:on    6:off
添加后的效果:
#!/bin/sh
#
# chkconfig: 35 70 30
# The Apache HTTP Server
第三步:开机启动
chkconfig --level 35 httpd on
或
chkconfig httpd on
解释说明:
chkconfig –list 列出所有的系统服务
chkconfig –add httpd 增加httpd服务
chkconfig –del httpd 删除httpd服务
chkconfig –level httpd 2345 on 把httpd在运行级别为2、3、4、5的情况下都是on(开启)的状态。
第四步:手动启动
/etc/init.d/httpd start
/etc/init.d/httpd stop
若不喜欢默认开机启动脚本,也可自己写脚本,参考如下:
vim /etc/init.d/myhttpd
#!/bin/bash
#
# chkconfig: 12345 80 90
# description: The Apache HTTP Server

function start_http()
{
    /opt/httpd-2.4.2-server/bin/apachectl  start
}
function stop_http()
{
    /opt/httpd-2.4.2-server/bin/apachectl  stop
}

case "$1" in
start)
    start_http
;;
stop)
    stop_http
;;
restart)
    stop_http
    start_http
;;
*)
    echo "Usage : start | stop | restart"
;;
esac
使其可执行:
chmod +x /etc/init.d/myhttpd
4、验证安装是否成功
1)打开浏览器,输入 http://localhost 或 http://localhost:80 (httpd默认端口是80)

配置成功!
Ubuntu安装php步骤 ,请参考我的博客 Linux 搭建 discuz 论坛
2)打开验证index.php
拷贝php.ini:
sudo cp php.ini-development /opt/php-5.4.15-server/lib/
修改apache httpd.conf:
sudo vi /opt/httpd-2.4.2-server/conf/httpd.conf
在 AddType application/x-gzip .gz .tgz 下面添加以下两行:
AddType application/x-httpd-php .php
AddType application/x-httpd-php-source .phps
如下:
    #AddEncoding x-compress .Z
    #AddEncoding x-gzip .gz .tgz
    #
    # If the AddEncoding directives above are commented-out, then you
    # probably should define those extensions to indicate media types:
    #
    AddType application/x-compress .Z
    AddType application/x-gzip .gz .tgz

    AddType application/x-httpd-php-source .phps
    AddType application/x-httpd-php .php
检查 LoadModule php7_module modules/libphp7.so 是否已经添加 libphp7.so文件是否存在(重要、关键,否则php文件无法解析,会是下载文件状态)
LoadModule alias_module modules/mod_alias.so
#LoadModule rewrite_module modules/mod_rewrite.so
LoadModule php7_module        modules/libphp7.so
在 /opt/httpd-2.4.2-server/htdocs/ 目录下,新建一个文件 index.php:
sudo vi /opt/httpd-2.4.2-server/htdocs/index.php
<?php
    phpinfo();
?>
在浏览器中,输入网址: http://localhost/index.php,打开以下页面,说明配置php成功


5、配置开机自动启动
1) 复制 /usr/server/apache2/bin/apachectl到/etc/init.d
sudo cp /opt/httpd-2.4.2-server/bin/apachectl /etc/init.d/
2) 设置启动时为默认服务
sudo update-rc.d apachectl defaults
这样,开机就可以自动启动Apache httpd服务了
6、允许异地访问
Apache默认对本机(localhost)访问,为了让其它机器对其访问,需要修改conf/httpd.conf文件
1)修改默认网络端口
#Listen 12.34.56.78:80
Listen 8088 // 为了避免冲突,修改为8088
2)修改管理员邮件地址
#ServerAdmin you@example.com
ServerAdmin yanggang_xxx@163.com
3)修改域名,允许对外访问
#ServerName www.example.com:80
ServerName 172.27.29.14:8088
参考推荐:
configure: error: APR not found (推荐)
Compile Apache 2.4.2 in Solaris 10 in a x86 (Stack OVerflow)
原文: Ubuntu配置Apache
版权所有: 本文系米扑博客原创、转载、摘录,或修订后发表,最后更新于 2024-07-22 05:10:57
侵权处理: 本个人博客,不盈利,若侵犯了您的作品权,请联系博主删除,莫恶意,索钱财,感谢!
转载注明: Ubuntu / CentOS 配置Apache、sqlite3、apr、apr-util、pcre2、zlib (米扑博客)